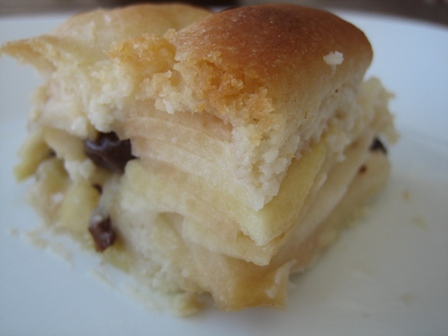
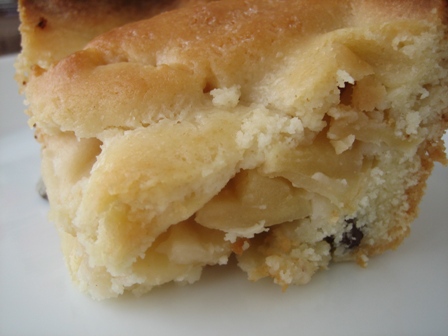
This week’s Tuesdays With Dorie recipe, Russian Grandmothers’ Apple Pie-Cake, was chosen by Natalie over at Burned Bits. Thanks Natalie, for choosing such a wonderful recipe! Not that a fabulous Dorie recipe is anything of an anomaly; each and every one I have tried has been wonderful. This recipe is labeled as a “pie-cake” due to an apple mixture being sandwiched between two layers of crust (very pie-like) and the crust itself being more of a shortbread-cakey crust than a flaky pastry crust. The combination of these elements was truly spectacular. I am a *huge* crust fan, and I have to admit that after we ate the inaugural pieces, I kept breaking off pieces of crust and eating it. This was a wonderful dessert, and a recipe that I will save, as it would be perfect for a late summer or fall get together. It has a warm, homey, and rustic feel to it.
I cut this recipe in half, using an 8×8 pan and ended up baking it for around 50 minutes. I used all Gala apples, and I thought the flavor was perfect in this dish. A number of people mentioned having some problems with sticky dough, but mine came together soft and just about perfect. I used all of the flour, as Dorie states is almost always the case, and just a smidgen more sugar than the recipe called for. Again, this was such a wonderful dessert. Dorie also suggests that this could be made into individual turnovers, and in fact Nick suggested that before he even saw the recipe! I think this would be great in that form, or even in individual ramekins. So many wonderful options!
Tuesdays With Dorie continues to grow by leaps and bounds! We are now at over 70 members; head on over to the Tuesdays With Dorie blog and click through the blogroll to see how everyone else did with this week’s recipe.
Next week: Brioche Raisin Snails
Russian Grandmothers’ Apple Pie-Cake
(Source: Dorie Greenspan’s “Baking: From My Home to Yours” pages 310-311)
For The Dough
2 sticks (8 ounces) unsalted butter, at room temperature
1 cup sugar
2 large eggs
1 tablespoon baking powder
1/2 teaspoon salt
Juice of 1 lemon
3 1/4 – 3 1/2 cups all-purpose flour
For The Apples
10 medium apples, all one kind or a mix (I like to use Fuji, Golden Delicious and Ida Reds; my grandmother probably used dry baking apples like Cordland and Rome)
Squirt of fresh lemon juice
1 cup moist, plump raisins (dark or golden)
1/4 cup sugar
1 1/4 teaspoons ground cinnamon
Sugar, preferably decorating (coarse) sugar, for dusting
To Make The Dough: Working with a stand mixer, preferably fitted with a paddle attachment, or with a hand mixer in a large bowl, beat the butter and sugar together on medium speed until smooth, about 2 minutes. Add the eggs and continue to beat until the mixture is light and fluffy, about 3 minutes more. Reduce the mixer speed to low, add the baking powder and salt and mix just to combine. Add the lemon juice – the dough will probably curdle, but don’t worry about it. Still working on low speed, slowly but steadily add 3 1/4 cups of the flour, mixing to incorporate it and scraping down the bowl as needed. The dough is meant to be soft, but if you think it looks more like a batter than a dough at this point, add the extra 1/4 cup flour. (The dough usually needs the extra flour.) When properly combined, the dough should almost clean the sides of the bowl.
Turn the dough out onto a work surface, gather it into a ball and divide it in half. Shape each half into a rectangle. Wrap the dough in plastic wrap and refrigerate for at least 2 hours, or for up to 3 days. (The dough can be wrapped airtight and frozen for up to 2 months; defrost overnight in the refrigerator.)
To Make The Apples: Peel and core the apples and cut into slices about 1/4 inch thick; cut the slices in half crosswise if you want. Toss the slices in a bowl with a little lemon juice – even with the juice, the apples may turn brown, but that’s fine – and add the raisins. Mix the sugar and cinnamon together, sprinkle over the apples and stir to coat evenly. Taste an apple and add more sugar, cinnamon, and/or lemon juice if you like.
Getting Ready to Bake: Center a rack in the oven and preheat the oven to 375 degrees F. Generously butter a 9×12-inch baking pan (Pyrex is good) and place it on a baking shee tlined with parchment or a silicone mat.
Remove the dough from the fridge. If it is too hard to roll and it cracks, either let it sit at room temperature for about 15 minutes or give it a few bashes with your rolling pin to get it moving. Once it’s a little more malleable, you’ve got a few choices. You can roll it on a well-floured work surface or roll it between sheets of plastic wrap or wax paper. You can even press or roll out pieces of the dough and patch them together in the pan – because of the baking powder in the dough, it will puff and self-heal under the oven’s heat. Roll the dough out until it is just a little larger all around than your pan and about 1/4 inch thick – you don’t want the dough to be too thin, because you really want to taste it. Transfer the dough to the pan. If the dough comes up the sides of the pan, that’s fine; if it doesn’t that’s fine too.
Give the apples another toss in the bowl, then turn them into the pan and, using your hands, spread them evenely across the bottom.
Roll out the second piece of dough and position it over the apples. Cut the dough so you’ve got a 1/4 to 1/2 inch overhang and tuck the excess into the sides of the pan, as though you were making a bed. (If you don’t have that much overhang, just press what you’ve got against the sides of the pan.)
Brush the top of the dough lightly with water and sprinkle sugar over the dough. Using a small sharp knife, cut 6 to 8 evenly spaced slits in the dough.
Bake for 65 to 80 minutes, or until the dough is a nice golden brown and the juices from the apples are bubbling up through the slits. Transfer the baking pan to a cooling rack and cool to just warm or to room temperature. You’ll be tempted to taste it sooner, but I think the dough needs a little time to rest.
Hankering for some more pie? Check out my American Apple Pie.
Filed under: Cakes/Cupcakes, Pies/Tarts, Tuesdays with Dorie |


Nice lookin pie-cake!!!
Thank you noskos! 🙂
[…] week we will return to our regularly scheduled programming with Russian Grandmothers’ Apple Pie-Cake. Look […]
Thank you noskos! 🙂
yum!! this looks so good..I really hate that I missed making this! I will definitly have to catch up with it!
April – Thank you! We thought it was just wonderful. It’s definitely one to go back to, and not at all complicated!
Yours looks fantastic. I think it’s funny how I thought this might not be anything special, and my family ended up loving it.
Madam Chow – Thank you! We really enjoyed it as well, I think it’s a great non-fancy dessert to be enjoyed at any time!
Mmmm… your’s looks so dainty and pretty! I’m jealous you were able to get such a good looking piece out of the pan without it falling apart! Ha! Anyway, I loved this recipe, too!
Looks great Chelle. Good to know I’m not the only one nibbling on the crust. It’s so good!
Aw, thank you Amy! I cut these after the cake had cooled overnight, don’t know if that makes a difference or not?
nikki – Thanks! I am a total crust fiend. I used to get yelled at on Thanksgiving as a kid because I’d always sneak pieces of crust off the pies 😉
This looks great! I love the layers of apples. I love the crust too- especially the edges where it’s just a bit crispy!
Erin – Thank you! And I agree – the crispy edges of the crust are the best!!
I just love how the layers of apples looks, so pretty!
Thank you mari!
Your pictures look scrumptious. I did the 8×8 pan too, but I don’t think I baked mine long enough–I pulled it out early because the crust was getting pretty browned. Still quite tasty though. =)
Di – Thank you! Mine was starting to brown around the edges so I struggled with when to take it out as well. You’re right – it tastes fabulous!
Yours looks absolutely fabulous! Did you do layers of dough instead of one layer? or maybe its the layers of apples that I am seeing… Great job!
-Clara
Thanks CB! I only did a bottom and top crust of dough – you’re just seeing layers of apples, I sliced them pretty thin.
Your apples are so uniform. I was haphazardly cutting them in all kinds of shapes and sizes. When I was done, it looked like a lunatic cut them up.
Looks perfect Chelle! Great job!
Hahaha, Laurie, I think I am inheriting Nick’s obsession with neatness and right angles 😉 It’s starting to rub off!
Your pie-cake looks amazing! I’m a huge crust fan too so my husband has been eating the center out of my turnovers and then handing me the crust. Yum!
Amanda – Thank you! And that’s so funny, my husband does that pizza – he eats the piece and then hands me the crust 😉
your apple pie-cake looks pretty, especially the top of crust! Mine has got uneven surface that doesn’t look good at all. 😉
Piggy – Thank you! Mine was a little bumpy as well, I think because the dough really adhered to the apples.
That looks yummy!
Great pictures! My husband really enjoyed his, although I did find it a bit dry. I added a scoop of vanilla ice cream and a drizzle of maple syrup and it really transformed it into spectacular!
It looks fabulous! The many layers of apples make me drool!! Great job!
Ulrike – thank you!
Marie – Thank you very much. I bet a drizzle of syrup was divine!
Annemarie – Thank you! 🙂
I’m a crust person too. Your pie-cake turned out great!
Dianne – Thank you! And you really can’t beat the crust – it’s the best part!
looks great Chelley!
Lovely cake, er, pie-cake. The layers of apple look great! I really like how that part turned out! Great job!
Crust looks divine!
smellslikehome – Thank you!
Gretchen – Thank you very much! I’m pretty sure that was sheer luck 😉
carrie – Thanks! It tasted wonderful as well!
Oh man this looks good! I have skipped over this recipe because it had no photo. I like to see what I’m aiming for. Thanks for the inspiration! I’ll have to bake this very soon 🙂
this looks soooo yummy! i really need to get this cookbook so i can join your group and bake delicious treats like this 🙂
Your pie-cake looks delicious. I would agree, too, about the crust. It took a lot of self-control not to peel off the top crust and it eat by itself.
That looks so good Chelley! You never cease to impress me!
Gigi – Thank you! Hopefully these pictures help you envision the final product and you go for it – it’s an amazing recipe!
kayte – Thank you! You should definitely get this book – I haven’t been disappointed with a recipe yet!
Judy – I must admit – with one row left, I did eat off the entire top crust. I should be ashamed 😉
Ally – Aw, you are so sweet 🙂 Thank you for the compliments!
It looks great! I thought the crust was great too…it was even better raw (oops!)
Melissa – I have been victim of the fear of raw eggs that my mom instilled in us as youngsters and never can bring myself to taste raw batter or dough… I think I need to get over this 😉
I like the idea of the individual ramekins. I bet that would be a perfect way to serve this dessert. Your pie cake turned out beautiful!
Lori – I agree, ramekins would be so cute! And thank you 🙂
My great grandmother was Russian and this definitely looks like the kind of dessert she would have made
70 people! Glad you liked it – love the pictures!
What a beautiful job you’ve done with this one. I’m relieved to know it can be halved… the dough that’s resting in my refrigerator is destined for mini pies for a breakfast buffet at work tomorrow, but I sense this recipe’s going to be a repeater.
You did a great job. This recipe made now a tour around the world. I think a lot of children will grow up with this pie-cake as a blueprint for apple pie 😉
It looks awesome Chelle!!! Yum Yum Yum.
Mmm your cake looks good. I’m a huge crust fan too. I’d be happy eating just pie crust with no filling!
this loks great, and your apples look so neatly stacked up inside! i’d like to try the turnover version, too!
This was a very versitile recipe. I have seen a lot of creative ways that I didn’t even think of.
Kate – That’s a perfect test to this recipe’s authenticity!
Natalie – I know, we’re growing so fast! And I believe we’re now up to 80!
Dolores – Thank you very much. This halved recipe worked great for me, and I already want more! I think turnovers would be great for breakfasts!
Claudia – Thank you! I agree, this will become a staple in our house!
Amber – Thank you! It was delicious!
Ashley – Pie crust with no filling is a dream 🙂
steph – Thank you! I think I totally lucked out with how neat those apples look 😉
peabody – I agree, there are tons of things you can do with this recipe, and I definitely plan on experimenting with it!
Wow what a great blog! I just found you from JoyTheBaker’s blog and was a find it was!
My Sweet & Saucy – Thank you so much! I just visited your blog and it is absolutely wonderful.
Chelle….this looks FABULOUS! It had to be delicious.
Love, Mom
i love the first photo 🙂 it looks perfect!
i didn’t have as much luck w/the turnovers, but that was b/c my dough was too sticky; i’m sure you’d have better luck w/it than i did…
Mom – Thank you! It was so good, I’ll have to make it for you the next time you visit 🙂
Jaime – aww thank you! I think I’ll give the turnovers a shot the next time I make this.
[…] week: Russian Grandmothers’ Apple Pie-Cake Next week: Caramel-Topped […]
[…] Russian Grandmothers’ Apple Pie-Cake […]